Word Archives - AdvantEdge Training & Consulting
Compare two versions
Microsoft Office, Word

Word – The smart feature that makes comparing 2 versions of a document a snap

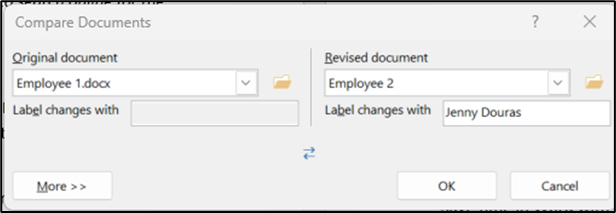
Have you ever received an edited document from someone but they didn’t track their changes, so you can’t easily see what is different from the original?  Or maybe you have multiple people working on a complex document and you want to see what has changed from one iteration to the next, through the development process.  In Word this is a great feature that allows you to compare 2 versions of a document that automatically red-lines the changes so you can view each edit or difference between the 2.  You can compare two documents regardless of how you are storing them or identifying the different versions.  For example, 1) if you are saving your documents in OneDrive or SharePoint, and it is automatically saving revisions as different versions stacked on top of each other, or 2) if you are saving them on your computer or a shared company server, where you are naming them as v.1, v.2, etc., to designate a different version, but they are really different documents.  If you are viewing your document online in a web window, you will first need to Open it in the Word Desktop App, since the compare feature is not an available command in the web version or Word. If you are viewing the document already in the Word App on your computer, you can skip to step 3 below: Make your documents shine with a Word training course from AETC

Word – The smart feature that makes comparing 2 versions of a document a snap Read Post »

Table of Contents
Word

Word: Create a Table of Contents

Ever wonder if there is an easy way to create a Table of Contents? If you use the Styles group options to create your documents, then there is an extremely easy way to create it. The Table of Contents command, located in the References tab, uses styles to determine what should be listed in the Table of Contents. Once the document is formatted, and depending on the Table of Contents option selected, place the cursor on the page and location that you would like to have the Table of Contents populated. In most cases, this will be page 2 of the document. Click the command dropdown and select the preferred table formatting. Note that the options show which styles to use, when planning your Table of Contents. Let’s check out an example of what it looks like. Sample: Table of Contents: To update the Table of Contents, you simply click inside of table and click the Update Table command. A new dialog box will appear, asking if the whole table should be updated or only the page numbers. Any added headers will be updated in the Table of Contents. For more ways to make editing documents easier, check out AETC’s Word Training Classes.

Word: Create a Table of Contents Read Post »

Word

Start page numbers on page 2 in Microsoft Word

This tip is applicable for all versions of Word including 2010, 2013, 2016, 2019 and 365. How do I start page numbers on the second page of my Word document? Word by default starts page numbers on the first page of a document, but in some cases, this doesn’t make sense. If the first page is a cover page, or a title page, then the second page of the document should be page 1, and the first page shouldn’t be labeled at all. In order to start page numbering on the second page in Microsoft Word, follow the instructions below. (Follow the additional instructions at the links on the bottom of the page for other page number formatting such as roman numerals). • Insert page numbers by clicking on the Insert tab on the Ribbon, and then clicking on the Page Number option in the Header & Footer group • From the menu options, select the location on the page where you would like the page numbering to appear (such as the bottom or top of the page) • This will open the Header & Footer Contextual tab of commands on the Ribbon. In the Options group, select Different First Page. (This may start page numbering on page 2, but the second page will be labeled “2“. This isn’t what we wanted. There is an extra step to making this page say “1“.) • Next, select the Page Number button in the Header & Footer group on the Ribbon, then choose Format Page Numbers • In the resulting window, change the number at the bottom in the Start at: field to 0. Then click OK • Now, because you selected to have a Different First Page in numbering, you can now delete the “0” from the first page and it will not effect the numbering on all of the subsequent pages. Additional details: By selecting the Different Frist Page option, you basically created a different Section for the first page from the rest of the pages. This allows you to format and number them differently. Sections are a powerful tool in Word that can help with outlining, page numbering, and other custom Header and Footer formatting. You can insert sections into various parts of a document by using the different Breaks, in the Page Setup group, on the Layout tab of the Ribbon. Then after you have created the different sections, you can create different footers or headers for each section. If you need to get creative with your page numbers, check out our tip on Page Numbering in Word with Different Formats, which will give you some additional options. Also, check out this tip on Start page numbering on page 2 in Microsoft Word with Roman Numerals. Learn even more tips and tricks with a Word training class from AdvantEdge Training & Consulting.

Start page numbers on page 2 in Microsoft Word Read Post »

Word

Using Word Templates

When you were in school, you probably had to write according to standards set forth by the your school, such as the APA or MLA stylebooks. In Word, you can preset a template that meets those standards, and not have to remember it again. Every time you open your Word template, the document format is ready to go, waiting for you to start writing. The nice thing about a template is that it is very hard to overwrite it, as a template will force you to do a Save As, saving your work as a Word document, rather than a template. To overwrite your template, you would need to change the file type, save the new template in the same place as the old template, and name the template you are trying to save wi8th the exact  same name as  the original template. Plus, you would still need to confirm the overwrite. It is just the opposite for a regular document, as a regular document can be overwritten just be clicking save. To create a template, you need to first create a regular Word document with all the correct formatting. Once you have done this, follow these steps to turn it into a template: Click the File tab to go to the backstage area. Click the Save As section on the left. Click Browse. A dialog box will appear that will allow you to name the template ans store it where it is convenient for you. Click the Save as type drop-down menu and select Word Template. Choose where you would like to store the document and click Save. You can close the file and your template is saved. It can be easy to think you are using a template, when you are actually mistakenly working within a regular document.  There is one sure way to know, which is to check the document icon. If it has a blue stripe across the top, it is a template; if not, it is a regular Word document. Learn all the ways to make Word work harder for you by taking a training class from AdvantEdge Training.

Using Word Templates Read Post »

Word

Selecting Text in Word

There are different ways to select text in a Word document, from a single word to the entire document. Sure, you can drag-select text anywhere in a document, but selecting text with a few clicks can be much faster. Just click to select text Single-clicking anywhere in text gets you where you are going, but it does not select any text for you. However, single-clicking to the left of any line of text will select the entire line of text. Double-clicking an individual word will select the word, while double-clicking just to the left of a paragraph will select the entire paragraph. Triple-clicking within your text will select the entire paragraph, while triple-clicking to the left of your text will select the entire document. Didn’t know Word could be simplified like this? Take an AETC training course to find out more!  

Selecting Text in Word Read Post »

Word

Professional Symbols – Word

Have you ever wondered how to add the various professional symbols in Word? Symbols for copyright, trademark, and others are available, but they are not always easy to find. The good news is that once you find the symbols you regularly use, they will remain in the Recently Used Symbols section: To find these symbols, you will need to click the Insert tab, and go to the far right side of the ribbon to the Symbols group. Click the Symbols command, then click More Symbols to open the Symbols dialog box: Once the dialog box is open, you can scroll through all of the symbols, and insert them into your document by selecting the symbol, then clicking the Insert button. This will also add the symbol to the recent area: If you want to use a Shortcut Key for your new symbol,  set this up by pressing the Shortcut Key… button, or hold down the Alt key and press K. Both of these will open the Shortcut Key dialog box. Press the keys you want for the shortcut, and ensure they populated correctly; then click the Assign button: Note that a unique shortcut must be used, as Word will not allow you to save two shortcuts that use the same keys. Make Word a more powerful tool by taking a training course with AdvantEdge Training & Consulting.

Professional Symbols – Word Read Post »

Word

Custom Bullet Points in Word

Customizing a bullet point can be fun and useful, bringing more attention to important information. As with anything new, using this method to bring attention to information takes a little time to get others in sync with you. However, once it catches on, it can help people understand what is a priority, when it comes to various task lists, or more importantly, when it comes to vital information needed for a project or job. Let’s take a look at how to create a custom bullet point. Create four lines of text, to be used with the bullet points Highlight the four lines of text, and click the drop-down arrow for the Bulleted List,  located in the Paragraph group, in the Home tab of the ribbon Click Define New Bullet at the bottom of the menu Click the Symbol button – This will bring up a dialog box for all available symbols  Click the drop-down menu for the Fonts symbols menu, and select Wingdings, towards the bottom of the menu  Select a symbol that will stand out, and click OK twice Your bullets will change over to the new bullet shape  If you return to the Define New Bullet dialog box, note there is a selection to use pictures as bullet points. This is a fun way to use company logos as bullet points, but keep in mind that some pictures do not display well as bullet points.  For more tips and tricks in Word, sign up for a class from AdvantEdge Training & Consulting!

Custom Bullet Points in Word Read Post »

Word

Word Overtype Mode

In early version of Word, you could press your insert key on your keyboard to either type over (replace) text or insert new text. The default was to insert text, but you could quickly toggle to the replace or type over function by pressing the Insert key on the keyboard. After Word Version 2003, in the more current versions of Word in Office 365, Word 2019 and Word 2016 the inset key on the keyboard does not always work as it used to. So, how do you toggle between insert and type over/replace without having to first select the text? That function is available in the newer versions of Word; it just isn’t set up by default.Follow these steps to turn it on: Click on the File tab, then select Options Click on the Advanced option from the list In the Editing Options section, check the box next to Use the Insert key to control overtype mode   Click OK to exit the options Now you can use the Insert key to toggle the overtype mode on and off For more tips and tricks, take a Word training course with AdvantEdge Training & Consulting.

Word Overtype Mode Read Post »

Word

Translations in Word

Have you ever needed to translate a document into another language or a document from another country into English? Follow these steps to have Word do it for you: Select text that you wish to have translated. We are going to use the following: I have many things to accomplish. Select the option to translate; you can choose the entire document or selections from your document. For this example, we will translate from English to French. To choose an option, select the Review tab, then click the Translate drop-down in the Language. Select your option; for this example, we will choose the Translate Selected Text A message box will appear that warns that the information to translate will be sent over the internet. Make sure that company policies allow this, if this is work related, before you translate anything. To escape out of the translation, click No; to proceed, click Yes. If you click Yes, a translation pane, titled Research, will appear at the right with information about the translation. Note the Microsoft Translator section shows the translation in French and has an Insert button, which will insert the text into the document when you are ready. You can have it overwrite the current text or have the text added to the document, as seen below. Learn more of what Word can do for you with a class from AdvantEdge Training & Consulting.

Translations in Word Read Post »

Word

Add a Watermark to a Document in Word

Make your documents look professional and official by adding watermarks, instead of using rubber stamps.On the Design tab, in the Page Background group, click the dropdown menu for the Watermark command. Click the watermark that you want to use, and it will appear in the background of your document. Get the skills you need to become a master of MS Office with a class from AdvantEdge Training & Consulting, your business training experts!

Add a Watermark to a Document in Word Read Post »

If you have at least 5 people we can create a session just for you.  Or, you can contact us for a private session. Contact Us

Questions? Don't see what you need?

We can help!

Business Training Classes
AdvantEdge Training & Consulting, Inc.

Recent Posts

Subscribe to our Newsletter

Copyright AdvantEdge Training & Consulting

This site is protected by reCAPTCHA and the Google Privacy Policy and Terms of Service apply.

Scroll to Top