
Customizing a bullet point can be fun and useful, bringing more attention to important information. As with anything new, using this method to bring attention to information takes a little time to get others in sync with you. However, once it catches on, it can help people understand what is a priority, when it comes to various task lists, or more importantly, when it comes to vital information needed for a project or job.
Let’s take a look at how to create a custom bullet point.
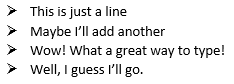
- Create four lines of text, to be used with the bullet points

- Highlight the four lines of text, and click the drop-down arrow for the Bulleted List, located in the Paragraph group, in the Home tab of the ribbon
- Click Define New Bullet at the bottom of the menu
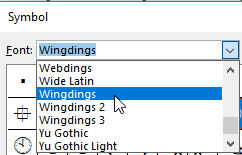
- Click the Symbol button – This will bring up a dialog box for all available symbols
- Click the drop-down menu for the Fonts symbols menu, and select Wingdings, towards the bottom of the menu
- Select a symbol that will stand out, and click OK twice
- Your bullets will change over to the new bullet shape

If you return to the Define New Bullet dialog box, note there is a selection to use pictures as bullet points. This is a fun way to use company logos as bullet points, but keep in mind that some pictures do not display well as bullet points.