Depending on the SharePoint licensing, a company can activate the out-of-the-box workflows, which can include two to five basic workflows. Those workflows can include two different approval workflows, signature and feedback collection workflows, and a three state workflow. In order to use some of these workflows, additional columns or changes to choices may need to be made, so that the workflows fit the needs of the company. Stock workflows need to be built for a specific list or library. Here is how to find and startup an out-of-the-box workflow:
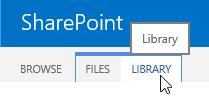
- Once a list or library has been created, click the List or Library tab of the ribbon. For our example, we will use the Documents library.

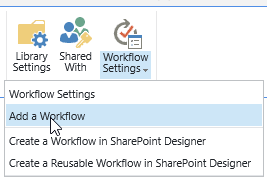
- Then click the dropdown menu for Workflow Settings, on the far right side of the ribbon in the Settings group, and select Add a Workflow.
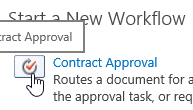
- For this tip, we will use the Approval workflow, which is the first choice in the list.
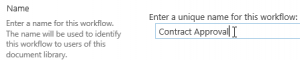
- Give it a unique name, so it is easy to figure out which workflow is being started.
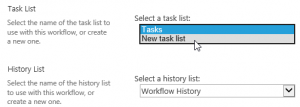
- If a task and history list are already created for the site, then the workflow will choose these to be used for the finished workflow; however, new task and history lists can be created by selecting the proper choices.
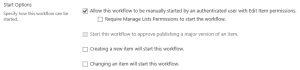
- Decide on the appropriate startup option. The three options include manually starting, starting when an item is created and starting when an item is changed or edited. Any combination of these can be marked as well. After making the start option choices, click Next.
- Once on the next page, assign approvers, and decide whether the tasks should be assigned one after the other or all at once (in parallel).
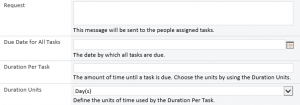
- The next few sections lay out details about the task message received, due dates, and durations.
- A carbon copy (cc) email address can be setup for the workflow. It is recommended that the person setting up the workflow uses their email address, at least in the beginning, for troubleshooting and ensuring emails are going out properly.
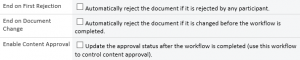
- There are a few more options for rejections and final approval. Then click the Save button at the bottom.
- Once the workflow process is complete, the person building the workflow will be redirected to the Workflow Settings Navigate back to the list or library with which the workflow was created, in order to start the workflow. All workflows created this way can only be started against a list item or library document.
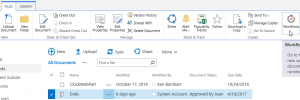
- Once back in our document library and ready to start our new workflow, we must select a document, click the Files tab on the ribbon, and then the Workflows command in the Workflows.
- Once the workflow page appears, click the workflow button, and the workflow will run for you.
AdvantEdge Training & Consulting offers SharePoint classes to help company power users get a better handle on what is available in SharePoint.